 Struggling with how to add Google Analytics to WordPress? Setting up a Google Analytics account isn’t especially complicated, but figuring out how to actually add the tracking code from Google Analytics to WordPress causes problems for many beginners.
If that sounds like you – you’re definitely not alone in feeling frustrated!
In this post, you’ll learn three different ways to add Google Analytics to WordPress, complete with each method’s pros and cons. The first two methods show you how to add the basic Google Analytics tracking code, while the third method gives you more advanced features like statistics reports inside your WordPress dashboard.
The only thing you’ll need to have before starting is a Google Analytics account. If you haven’t already signed up for Google Analytics, you can do that here. Then, continue on to learn how to add Google Analytics to WordPress.
Option 1: Use Free Insert Headers and Footers Plugin
One of the simplest ways to add Google Analytics to WordPress is to use the free Insert Headers and Footers plugin.
The advantages of this method are:
The only real disadvantage of this method is that it doesn’t give you any bells and whistles like the third method on this list.
To get started, install and activate the free Insert Headers and Footers plugin. Then, go to Settings → Insert Headers and Footers inside your WordPress dashboard:
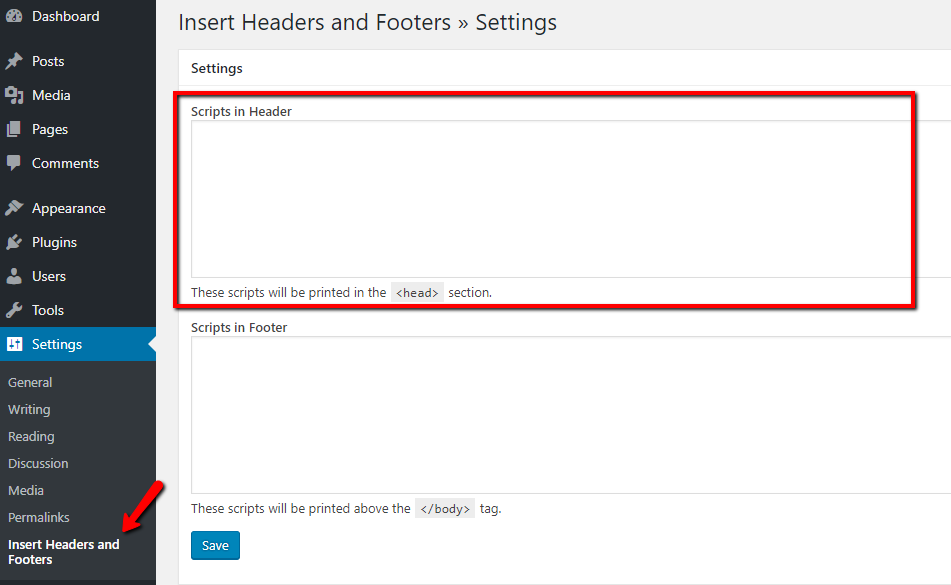
You need to add your Google Analytics tracking code to the Scripts in Header box.
To find your Google Analytics tracking code, head to your Google Analytics account and:
- Click the Gear Icon to access the Admin settings
- Choose Tracking Info to expand the list
- Select Tracking Code
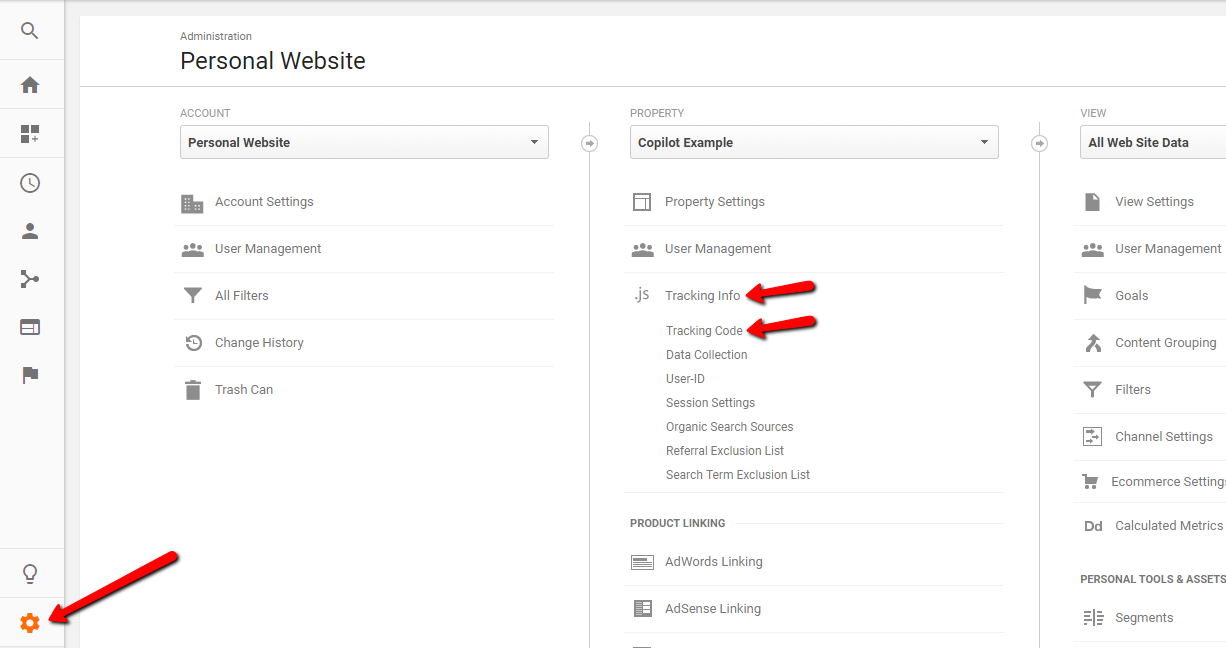
Then, copy the script in the Website Tracking box:
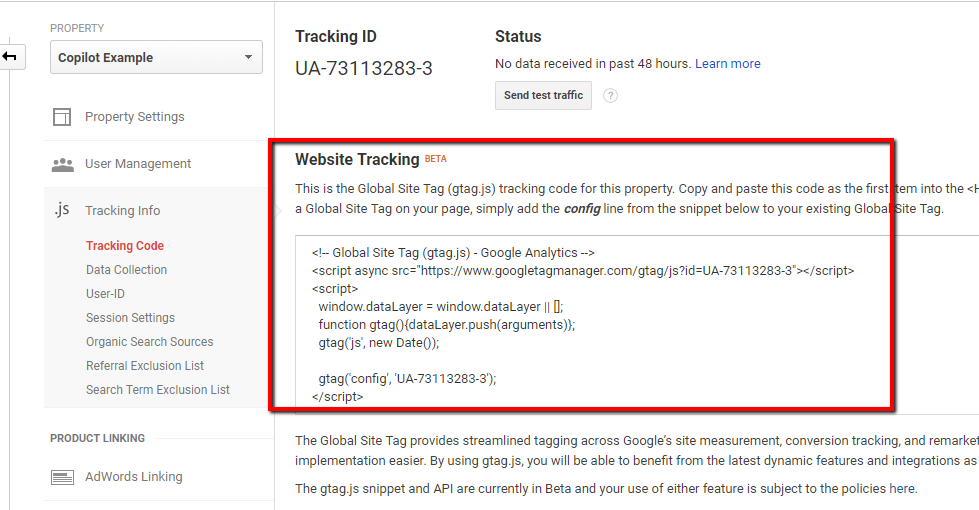
Go back to your WordPress dashboard and paste that code into the Scripts In Header box of the plugin. Then save your changes:
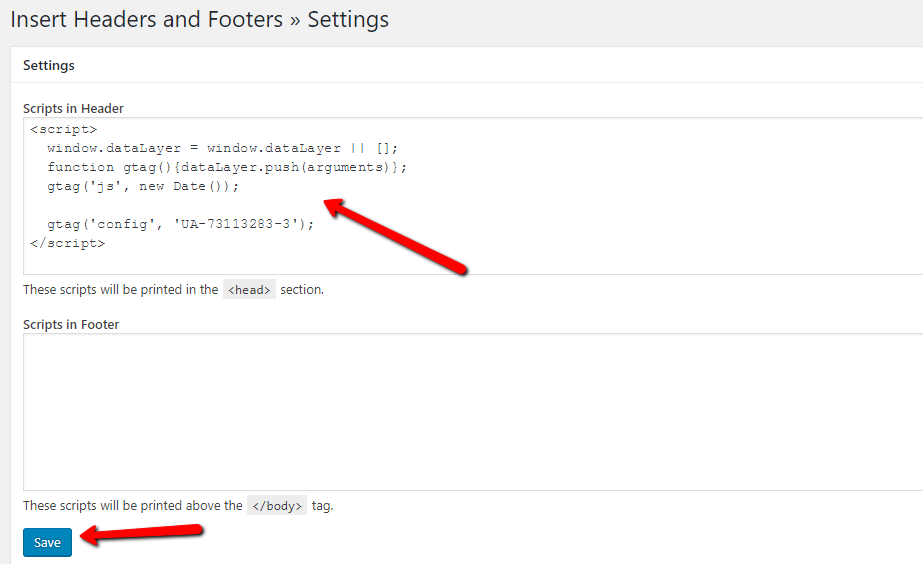
And you’re done! You should start seeing statistics in Google Analytics as your site receives traffic.
Option 2: Manually Add Tracking Code to Your Theme
As an alternative to the plugin above, you can also manually add the Google Analytics tracking code to your WordPress theme.
The advantages of this method are:
- You don’t need to install a plugin
- It’s easy to set up
The disadvantages are:
- You need something called a “child theme” to do it properly
- You’ll need to repeat the process if you ever switch WordPress themes
If you’re not sure how to use a child theme, you’re better off just using the previous method.
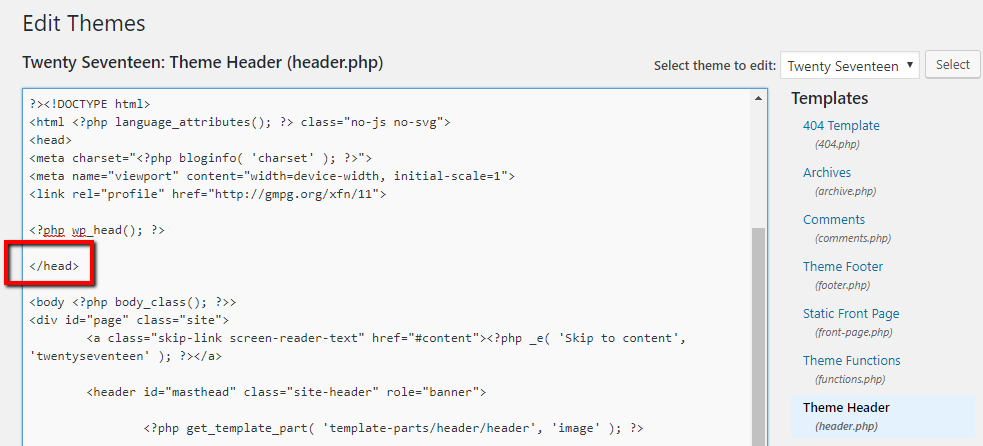
If you do feel comfortable with child themes, go to Appearance → Editor and edit the header.php file of your child theme.
Look for the </head> tag. You need to add the Google Analytics tracking code right before this tag:
Again, to find your Google Analytics tracking code, you need to:
- Go to your Google Analytics account
- Click the Gear Icon in the sidebar to access the Admin settings
- Select Tracking Info to expand the list
- Click Tracking Code

Then, look for the script in the Website Tracking box:

Paste this script into your header.php file right before the closing </head> tag:
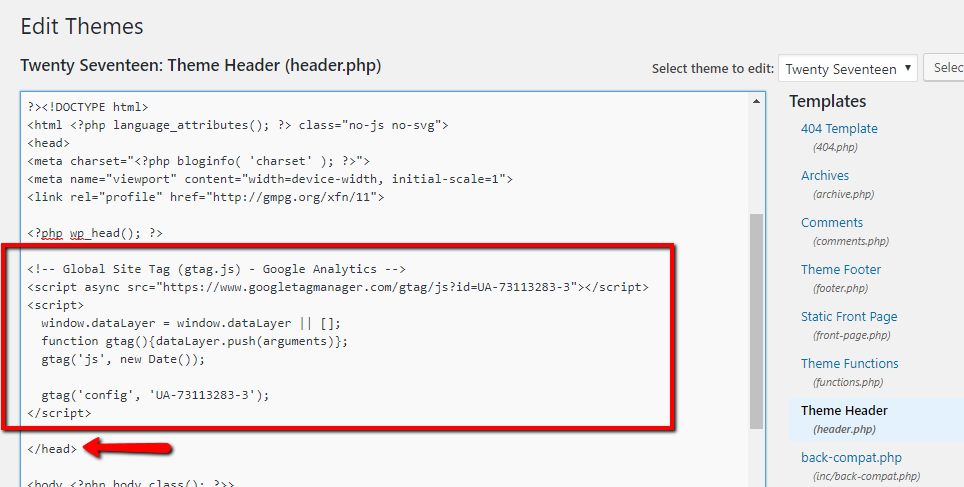
And that’s all there is to it! You should start seeing stats rolling in soon.
Option 3: Use Google Analytics Dashboard for WP Plugin
If you want more features than just adding the basic Google Analytics tracking code, you may be interested in the free Google Analytics Dashboard for WP plugin.
The advantages of this plugin are:
- It adds the basic Google Analytics tracking code
- It works even if you change themes
- You can view basic stats about your site inside your WordPress dashboard
- You can add advanced functionality like Google Analytics Event Tracking
The disadvantages are:
- The setup process is a bit more involved, though it’s not too difficult
- If you aren’t going to use those advanced features, it’s a bit overkill
To get started, install and activate the free Google Analytics Dashboard for WP plugin.
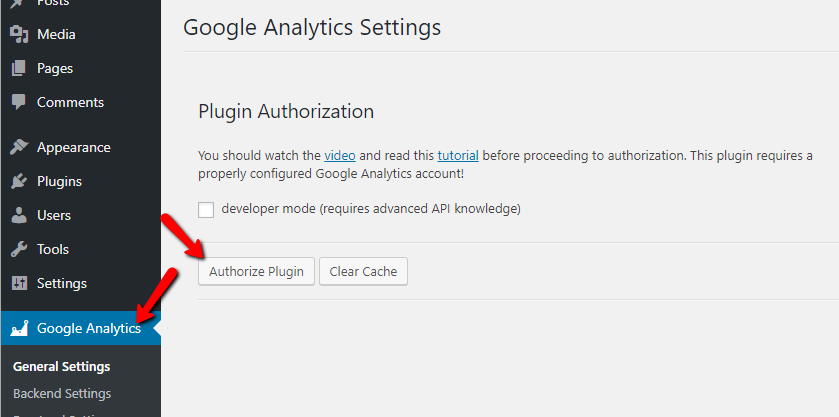
Then, head to the new Google Analytics tab in your dashboard to set up the plugin.
First up – click Authorize Plugin to give the plugin access to your Google Analytics account. Because the plugin shows stats inside your dashboard, this is essential for it to function:
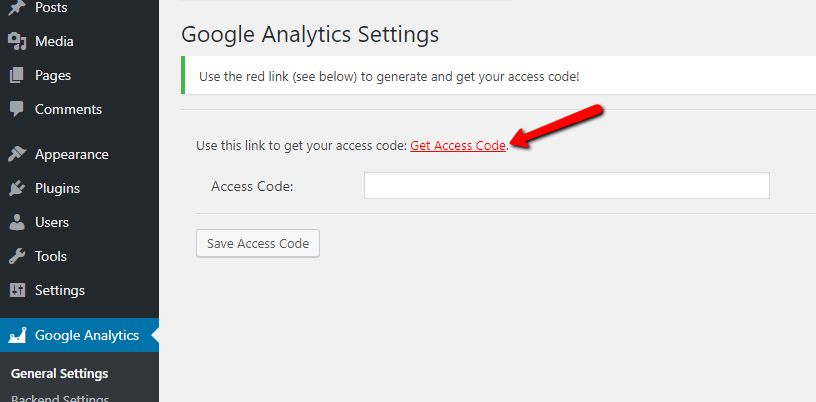
On the next page, click the red Get Access Code link to continue:
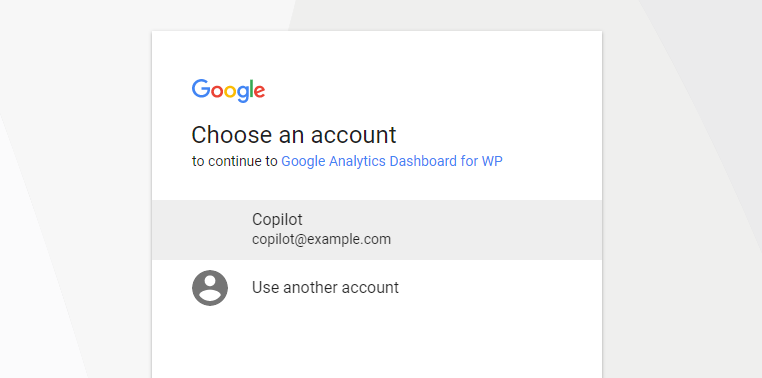
Then, choose the Google account associated with your Google Analytics account:
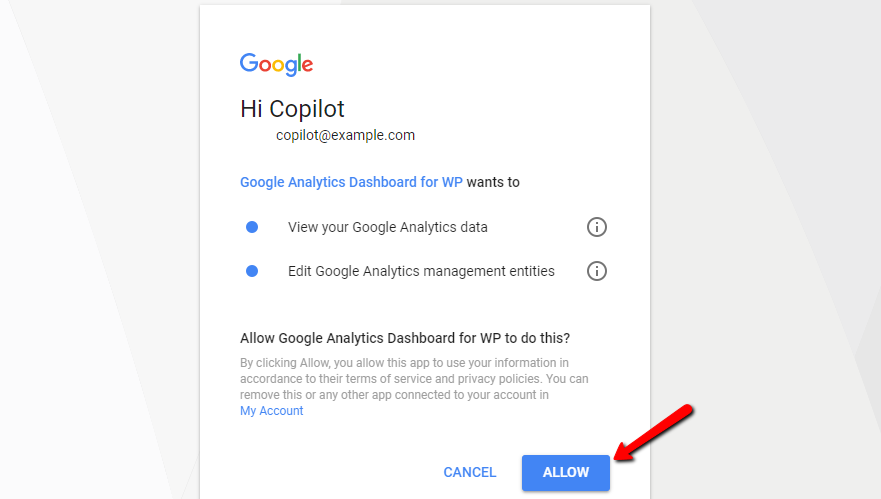
When you advance, click Allow to give the plugin access:
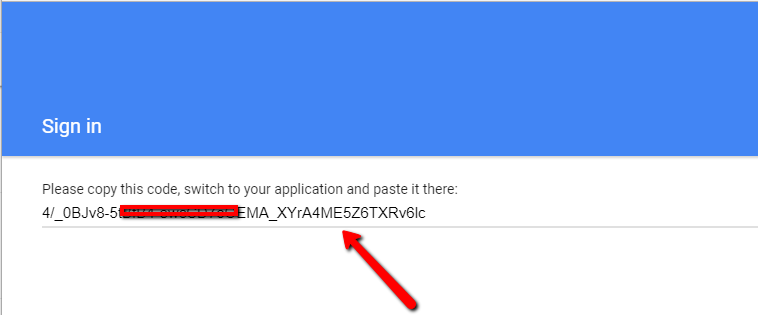
Then, copy the access code on the next screen:
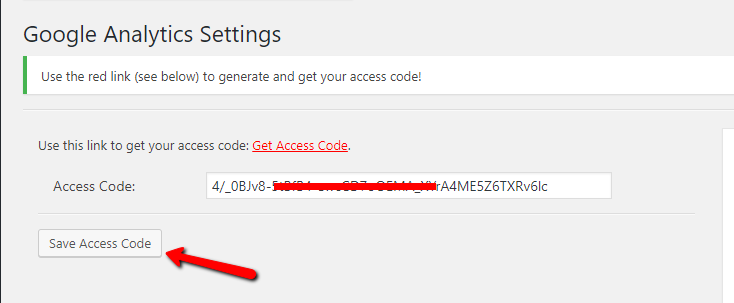
Head back to your WordPress dashboard and paste that access code into the Google Analytics Dashboard for WordPress interface and click Save Access Code:
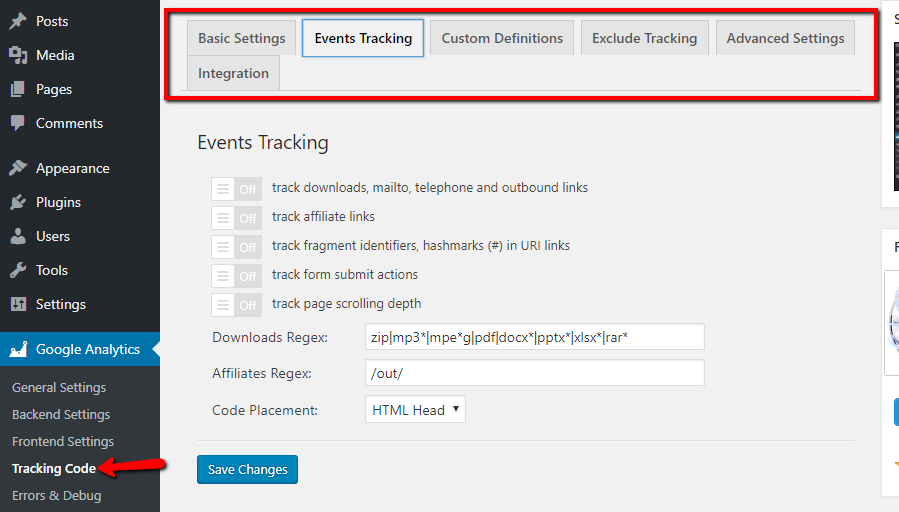
And that’s it! Your Google Analytics tracking is now active. You’ll also be able to view your site’s stats inside your dashboard. And to configure the plugin’s advanced settings, you can head to the Tracking Code option and use the tabs at the top:
Final Thoughts
If you just want a simple way to add Google Analytics to WordPress, the Insert Headers and Footers method is usually your best bet. Otherwise, you can try manually adding the Google Analytics code to your theme or use the more advanced Google Analytics Dashboard for WP plugin.
Finally, if you’re still struggling with how to add Google Analytics to WordPress, you can always hire a WordPress developer to do it for you.


 Struggling with how to add Google Analytics to WordPress? Setting up a Google Analytics account isn’t especially complicated, but figuring out how to actually add the tracking code from Google Analytics to WordPress causes problems for many beginners.


