 Has this ever happened to you? You make a change somewhere on your site. Then, you or your visitors are browsing away and…that change is nowhere to be seen! Where did it go and why isn’t it showing up?
Well, assuming you did all the normal stuff properly, one common culprit is caching. There are multiple types of caching, but a human-friendly general definition for “caching” is “storing some data in a static format to easily reuse later”.
Basically, while you may have made the change in your WordPress site’s settings, that change isn’t reflected on the front-end of your site yet because you or your visitors are still getting the static cached version instead of the most recent version.
In this post, I’ll talk very briefly about the different types of caching that might be in play on your WordPress site. Then, I’ll show you how to clear the WordPress cache for all these different issues.
What Types Of Caching Might Be An Issue For A WordPress Site?
When you’re talking about a WordPress site, most people’s first thought is going to be a caching plugin.
Most caching plugins implement something called page caching, which basically means that it creates a static HTML version of each piece of content on your site rather than dynamically generating the content with PHP for each visit.
So if you update a post without clearing the cache, visitors won’t see that change right away because they’re still getting the static HTML version (side note – many caching plugins will automatically clear the cache when you update a post to avoid this issue).
Another type of caching is browser caching. With this approach, your visitors’ web browsers will store certain static files – like images – on visitors’ local computers. One common example is your site’s logo. Your logo will rarely change, so it makes more sense to just store that file locally instead of forcing visitors to download it for each page view.
Finally, if you’re using a CDN like Cloudflare, your CDN will also cache your files at its global edge servers so that it can serve them up to visitors. That means if you change a file on your own server, that change might not be immediately reflected because visitors are downloading files from the nearest CDN edge server instead of your site’s main server.
Now that you know what’s happening, let’s go through how to clear your WordPress cache for these various areas. Here’s what I’ll cover – you can either skip straight to a specific section or read through the entire post:
- How to clear browser cache
- How to clear WordPress cache for 5 popular plugins
- How to clear Cloudflare CDN cache
How To Clear Browser Cache For Popular Browsers
There are two ways that this can work. First, if you yourself are experiencing issues with your site, clearing your own browser cache is an important step to make sure that you’re seeing the most recent versions of all your content.
How To Clear Your Own Browser Cache
If you’re only worried about a single page, you can use Ctrl + F5 for a PC, or CMD + R for a Mac, to force refresh the page and bypass the cache for a specific page on your site.
However, if you want to clear the browser cache for your entire WordPress site, you’ll want to clear your entire browser cache. The way that you do this depends on your browser, but I’ve collected the help docs for all the most popular browsers:
Usually, the process only takes a few seconds to do.
How To Clear Visitors’ Browser Caches
Unfortunately, there’s no way to clear your visitors’ browser caches for them. However, there is a method called cache busting that lets you achieve something similar.
Basically, all you do is use a different file name when you want to force visitors to re-download a file. Because the file name is different from the cached version, your visitors’ browsers will have them download the new file rather than serving up the cached version.
Let’s say that you change your site’s logo and want to make sure visitors immediately see the change. If your old logo is a file called logo.png, you could make your new logo a file called logo.v2.png.
Beyond using different file names, other techniques for cache busting are:
- Using different file paths – e.g. yoursite.com/v2/logo.png
- Adding query strings – e.g. yoursite.com/logo.png?ver=2
How To Clear WordPress Plugin Cache (Page Caching)
Unlike browser caching, page caching from a plugin affects the files that your server delivers to visitors. That means you have direct control over exactly how it works.
Most plugins make it easy to clear your WordPress cache. Once you do that, the plugin will generate a new cached version of your content that includes any changes that you’ve made.
Below, I’ll show you how to clear the WordPress cache for 5 popular caching plugins:
- WP Super Cache
- WP Fastest Cache
- W3 Total Cache
- WP Rocket
- Cache Enabler
Clear WordPress Cache In WP Super Cache
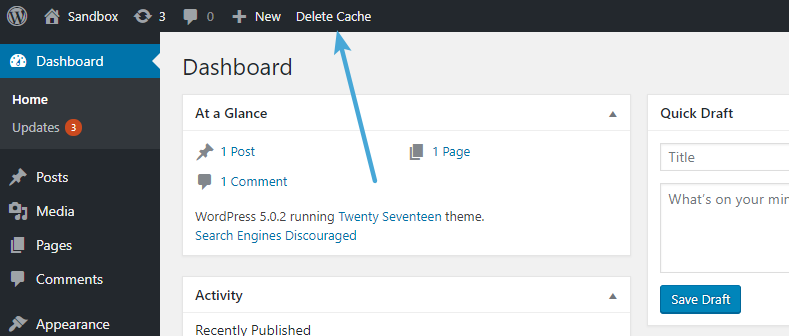
To clear the cache in WP Super Cache, look for the Delete Cache button in the WordPress toolbar:
Clear WordPress Cache In WP Fastest Cache
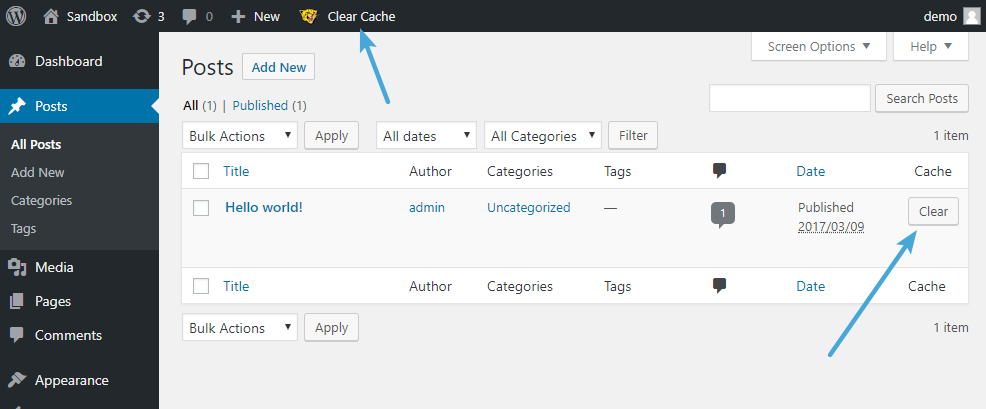
To clear the cache in WP Fastest Cache, you can use the Clear Cache button in the WordPress toolbar to clear the cache for your entire site. Or, you can use the Clear button in the Cache column of the post or page list to clear the cache for an individual piece of content:
Clear WordPress Cache In W3 Total Cache
Unlike most other caching plugins, W3 Total Cache offers multiple different types of caching. For example, object caching, database caching, etc.
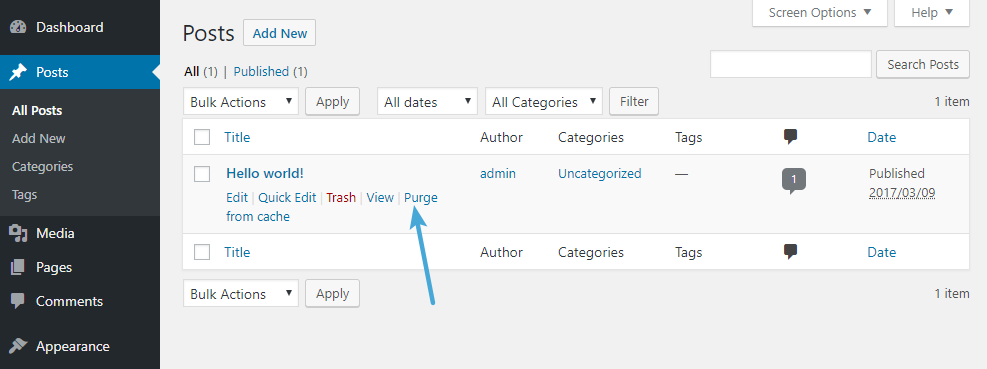
To clear the cache for a specific piece of content, you can hover over it in the post or page list and choose Purge from cache:
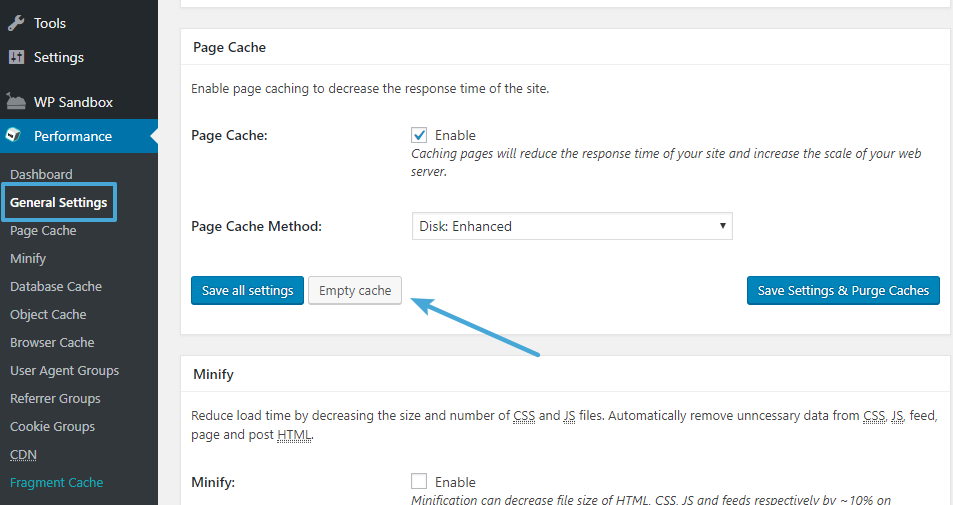
Or, you can also purge the entire cache for each different cache type by going to Performance → General Settings and choosing Empty cache next to your desired cache:
Clear WordPress Cache In WP Rocket
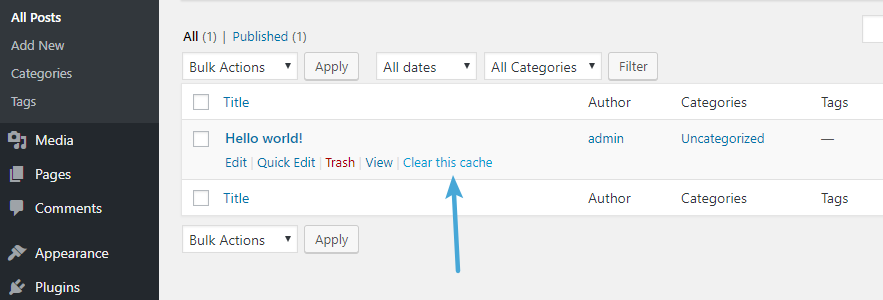
To clear the cache for a single post or page in WP Rocket, hover over the post or page in the main list and choose Clear this cache:
You can also clear the cache for your entire site from the WP Rocket tab in your WordPress dashboard.
Clear WordPress Cache In Cache Enabler
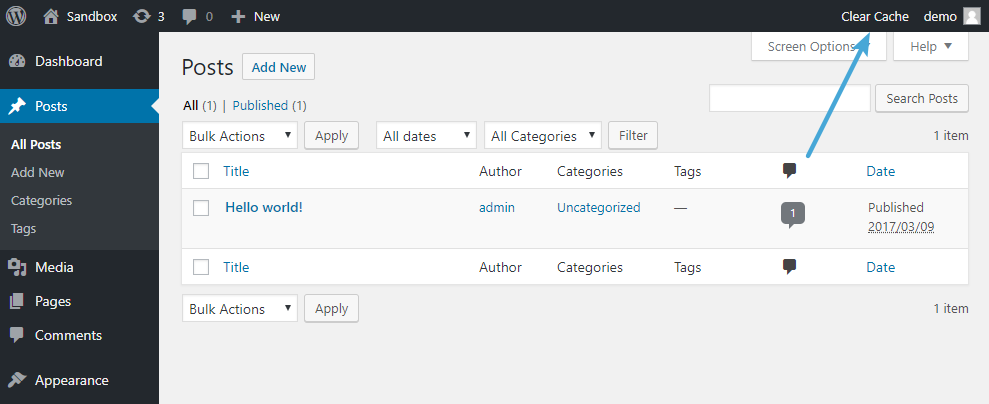
To clear the cache in Cache Enabler, you can click the Clear Cache button in the top-right corner of your WordPress toolbar to clear the cache for your entire site:
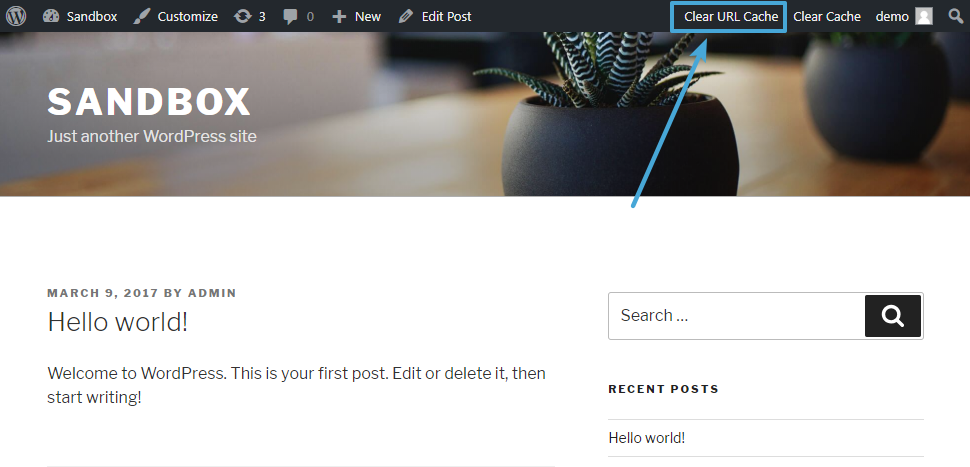
Or, you can clear the cache for a specific page by visiting that page while logged into WordPress and clicking the Clear URL Cache button in the WordPress toolbar:
How To Clear Cloudflare Cache (Or Other CDNs)
When you use Cloudflare or another CDN, the service works by “caching” copies of your static content on their own global servers around the world.
That’s good because it means that visitors can download content from their nearest CDN server and speed up your site’s page load times.
But it also means that if you make a change to one of your site’s static files, that change might not appear right away because the CDN still has an older version of the file(s) cached on its many global servers.
To fix that, you can force the CDN to clear its cache and create a new one with your most recent files.
I’ll show you how to clear your site’s cache on Cloudflare, but many other CDN providers offer similar functionality, so I’d recommend you consult your CDNs documentation if you’re using another provider.
To access the Cloudflare cache, go to the Caching tab in the Cloudflare dashboard:
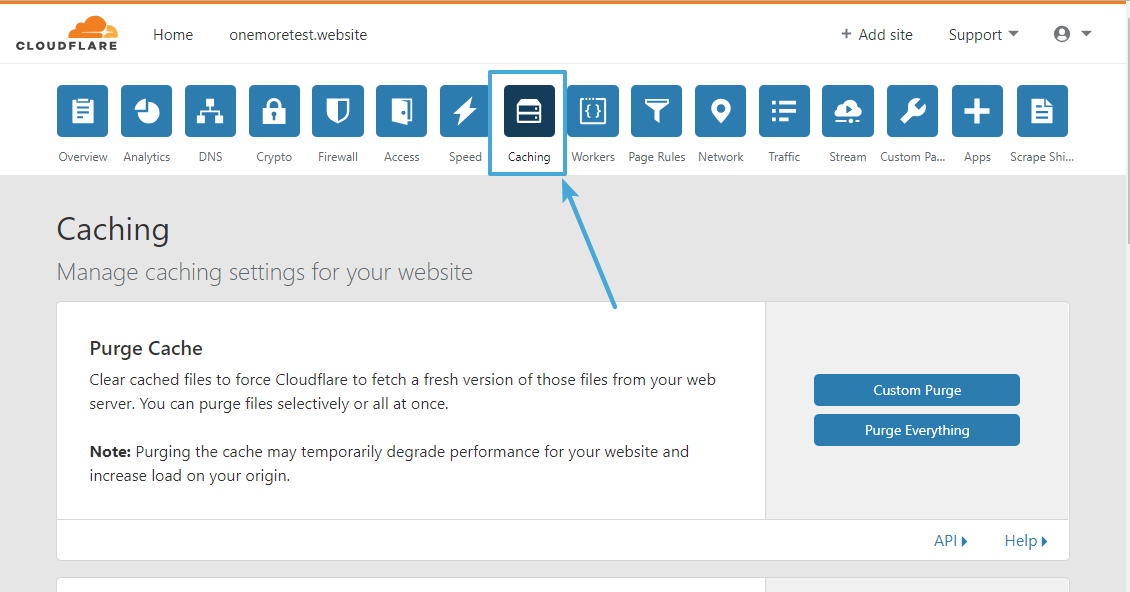
Then, you can use the Purge Cache box to clear the cache. While Cloudflare will let you clear the entire cache by clicking Purge Everything, I’d recommend using the Custom Purge option if you’re only experiencing issues with a single page or file.
This eliminates the need for Cloudflare to completely rebuild its cache, which lessens the load on your server.
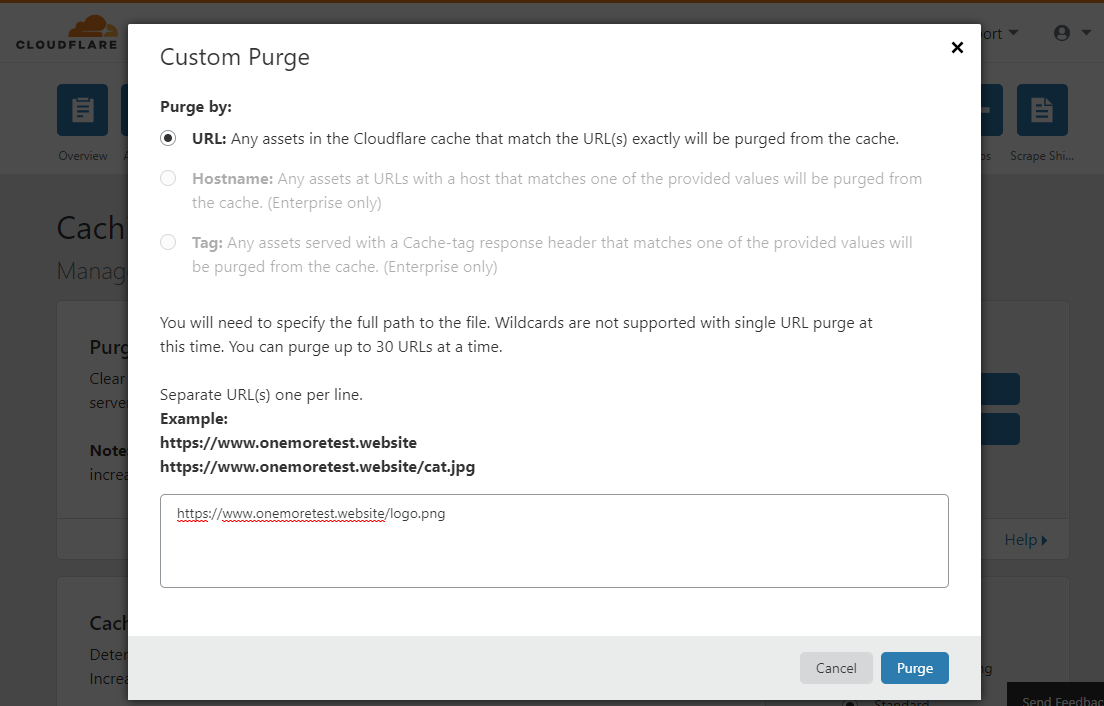
Once you click the Custom Purge button, you’ll be able to enter one or more URLs that you want to purge. For example, you can see that I’ve instructed Cloudflare to purge the cached version of my logo in the screenshot below:
That’s How To Clear WordPress Cache!
If you’re experiencing issues with your WordPress site, one of the first diagnostic steps that you take should always be to clear your cache.
This helps make sure that your site is experiencing a real issue, rather than just a mismatch between the cached version of your site and the changes that you’ve made.
And if all this talk of WordPress caching is giving you a headache, you can always reach out for help from a WordPress expert.












No Comment
You can post first response comment.